Bahn Mi Chicken Salad {Back To The Dinner Table For Recipe Redux}

From the Redux team

After the hustle and bustle of the holiday/vacation season, August is the time many families get ‘back to routine.’ Show us your favorite recipe to help families get ‘back to the dinner table.’ It might be a favorite family recipe from your childhood that you’ve ReDuxed; or maybe it’s your family’s current favorite. Let’s all gather back at the table!

DSC09290

I think that having a big container of shredded chicken ready in the fridge – whether it’s rotisserie chicken from the store or breasts that you’ve poached or slow-cooked yourself – is one of the easiest ways to make sure that a homemade dinner makes it to the table on busy nights.

Adam and I love chicken salad (I’ve got three legit recipes for it on the blog!) and this one, inspired by the Vietnamese sandwich masterpiece the Bahn Mi, comes together in a snap.   The sweet pickled vegetables help handle the heat from the Sriracha, but if you are really wimpy about spice, a Dijon mustard could sub in for the hot sauce nicely.

DSC09296

Bahn Mi Chicken Salad, makes 6 servings

  • 2 cups shredded carrots
  • 1 and 1/2 cups chopped cucumber
  • 1/4 cup granulated sugar
  • 1/2 cup rice vinegar
  • 1/2 tsp salt
  • 16 oz cooked chicken breast, chopped
  • 3/4 cup light canola oil mayonnaise
  • 1/3 cup chopped fresh cilantro
  • 1/4 cup Sriracha
  1. In a large bowl, combine carrots, cucumber, sugar, vinegar, and salt.  Let sit, stirring occasionally, for at least 20 minutes.
  2. Drain all of the liquid off of the vegetables.
  3. Add remaining ingredients to the bowl and toss until well-combined.

DSC09281

Click below to see what other Redux members cooked up this month…

Honey Chipotle Chicken And Vegetable Quinoa Bowls {Recipe Redux}

From the Redux team

Fresh from the Garden

The season of bountiful produce has arrived. Whether your produce comes from the Farmers Market, a CSA share, or a plot of dirt out back, show how you are using fresh July fruits or veggies.

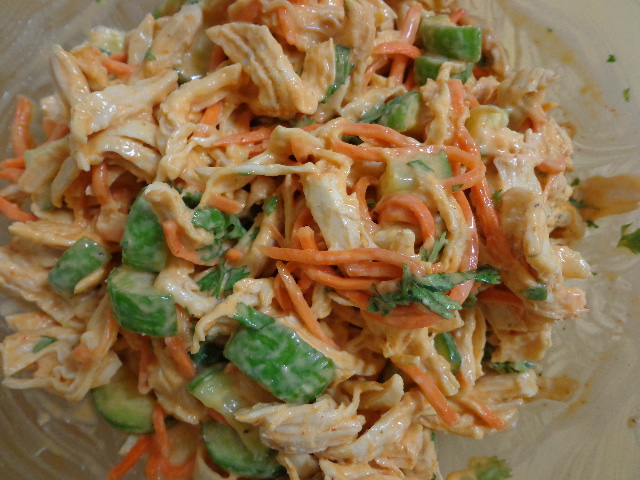
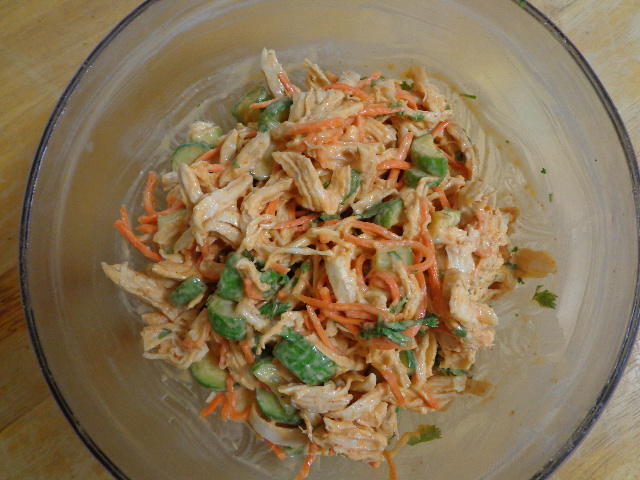
Bowls of grains and protein topped with big piles of roasted vegetables are a dinner favorite in our house year-round, but in the summer-time it’s nice to be able to count on in-season produce that’s both fresh and locally grown.

DSC08657

For these bowls I used both veggies and fruits – zucchini, grape tomatoes, and yellow peaches.  Plus some slightly out of season fresh lime juice.

Honey, chipotle, garlic, and lime marinated chicken strips.  Roasted zucchini.  And white quinoa with tomato, peach, honey, chipotle sauce.

DSC08652

Honey Chipotle Chicken and Vegetable Quinoa Bowls; makes 4 hearty servings

  • 1/2 tsp and 1/2 tsp salt
  • 1/2 tsp black pepper
  • 2 tsp smoked paprika
  • 2 tsp ground garlic
  • 2 limes, juiced
  • 1 Tbsp and 2 Tbsp extra-virgin olive oil
  • 1 Tbsp and 1.5 Tbsp honey
  • 7.5 oz can chipotle peppers in adobe
  • 1.5 lb boneless, skinless chicken breast
  • 4 cups sliced zucchini, sliced in 1/8 inch thick circles
  • 10 oz grape tomatoes
  • medium sweet onion, cut in half and then sliced into 1/4 inch thick half circles
  • 2 cups chopped yellow peaches
  • 2.25 cups low-sodium chicken broth
  • 1 cup white quinoa
  • 1/2 Tbsp canola oil

{In advance}  In a large, durable baggie, combine 1/2 tsp salt, pepper, paprika, garlic, lime juice, 1 Tbsp evoo, and 1 Tbsp honey.  Remove six chipotle peppers from the can (be sure to keep them!) and then dump the rest of the peppers and sauce into the bag.  Stir marinade until well-combined.  Add chicken breasts and toss to coat.  Marinate for at least 6 hours or up to 24 hours.

{When you’re ready to get cooking}  Preheat your oven to 375 degrees Fahrenheit.  Prep two baking sheets with baking spray (and aluminum foil if desired for easy clean up).  On one tray, place the zucchini in an even layer; they can be bunched but try not to overlap.  On the other tray, place tomatoes, onion, and peaches in an even layer.  Drizzle the remaining 2 Tbsp of evoo evenly over the vegetables, then sprinkle with remaining 1/2 tsp salt.

Roast the tomatoes, onions, and peaches for 20 – 25 minutes, until the tomato skins have begun to blister but not brown.  Remove that tray from the oven and set aside to cool.  Bake the zucchini for an additional 15 – 20 minutes, 40 – 45 minutes total.

{While the vegetables are roasting} Stir together chicken broth and quinoa in a medium pot on high heat.  Bring to a rolling boil then reduce heat and simmer for 15 – 20 minutes, until all of the liquid has been absorbed, stirring occasionally.

Pour the canola oil into a large, lidded pan over medium-high heat, turning the pan to coat.  Working in batches as needed so as not to overcrowd the pan, cover the pan and cook chicken breasts 5 – 7 minutes on each side until cooked through.  Set aside cooked chicken until cool enough to handle then slice into thin strips.

{Once the quinoa is cooked}  Allow the cooked tomatoes, onion, and peaches to cool for at least 5 minutes.  Place them in your food processor and process 5 – 10 seconds until homogenous.  Add the remaining 6 chipotle peppers and the remaining 1.5 Tbsp honey and process until combined.  Stir the sauce into the cooked quinoa.  Note – you most likely will have more sauce than you need, we used about 3/4 of our batch and then saved the rest for turkey sandwiches and tortilla chip dip.

{When you are ready to serve}  Divide the quinoa evenly among four bowls, topping with additional sauce if desired.  Top with cooked chicken and zucchini slices.  Serve outdoors, if possible.

DSC08662

DSC08666

Click the link below to see what other Redux members cooked up.  I’m hoping someone tackled watermelon!

Peanut Butter Banana Pretzel Pie {Recipe Redux}

From the Redux team

Tucked in a crust, nothing says love from the oven like pie. Whether it’s a twist on the all-American apple pie or a traditional recipe from your home country, give a healthy makeover to your favorite savory or sweet pie recipe.

I am excited to see what the other posters come up with, but I actually tend not to love the idea of healthying up dessert products… if you are looking to eat less sugar I’d rather you ate great cookies less often rather than sugar-free “cookies” every day.  So for this post I decided to go with a recipe that just happens to be a bit healthier from the start.

My Peanut Butter and cinnamon Banana ice cream Pretzel Pie (whew!) borrows the much-loved vegan concept of putting frozen bananas in the food processor to make soft-serve.  Peanut butter was an obvious pairing, the cinnamon adds a little depth, and the salty crunch of the pretzel offsets the sweetness perfectly.

dsc04705

Peanut Butter Banana Pretzel Pie;  8 servings

Cook Time: 10 minutes; Hands-on Time: 20 minutes; Total Time: 1.5 hours

  • 2 cups pretzels
  • 1/4 cup granulated sugar
  • 1/2 cup vegan butter substitute
  • 4 medium bananas, frozen
  • 1/4 cup unsweetened vanilla almond milk (if using a plain milk substitute just add 1/2 tsp vanilla extract)
  • 3/4 cup creamy peanut butter
  • 2 tsp cinnamon
  1. Preheat oven to 400 degrees Farenheit.
  2. Place unwrapped butter in the center of a 9-inch pie pan and put in preheating oven until butter is fully melted.
  3. Place pretzels into the bowl of the food processor and process until mixture is homogenous, 30 seconds to 1 minute.  Add sugar to bowl and pulse a few times until combined.
  4. When butter has melted, pour the crushed pretzels into the center of the pie pan.  Mix the crumbs and melted butter, then use your fingertips to gently push onto the bottom and up the sides of the pan.
  5. Bake crust 10 – 12 minutes until firm.  Set aside to cool for at least 15 minutes.
  6. Wipe out food processor (it doesn’t matter if a few pretzel crumbs get in your filling) and place bananas and almond milk into the bowl.  Process 2 – 3 minutes until smooth, scraping down the sides as needed.
  7. Add peanut butter and cinnamon to bowl and process 20 – 40 seconds more until well-combined.
  8. Pour filling into cooled pretzel crust, using a spatula to spread it in an even layer.
  9. Place pie in the freezer to firm up for 1 hour.  You can make and freeze the pie a few days ahead of time if you like, just be sure to place in the fridge to thaw for 30 minutes before serving.

dsc04709

What type of berry do most want to stuff in a pie crust this summer?

What I DIY {Recipe Redux}

From the Redux team: What favorite kitchen staples do you now make from scratch – but in the past you purchased? Show us your best DIY recipe for keeping cupboards, fridge or freezer stocked with healthy basics. Think homemade frozen waffles, salad dressing, broth or other kitchen essentials.

I admit to being a big fan of quick, convenience options in the kitchen.  I’ve never made beans from scratch, I regularly buy precooked chicken breasts to shred, and even though I have some fantastic bbq sauce recipes on the blog, I usually buy the bottled stuff.  Pesto, however, is a sauce we always make at home.

DSC07421

The jarred kinds usually are filled with additives, very high in sodium, and just not as tasty.  Homemade pesto can get a little expensive because fresh herbs tend to be pricy, so this version helps me get more bang for my buck by stretching my pesto with spinach.  Plus, this is a great way to sneak some more green veggies into our pasta.

Spinach Pesto

Yields: 11 oz; Total Time: 5 – 10 minutes

  • 8 cups fresh baby spinach
  • 2 oz fresh basil
  • 4 Tbsp extra virgin olive oil
  • 1/3 cup toasted pine nuts
  • 2/3 cup shredded Parmesan cheese
  • 1/4 tsp salt
  1. Working in small batches, pulse spinach, basil, and oil in a food processor.  Be sure to process until smooth, don’t stop when you’ve reached the grass cuttings consistency.
  2. Add Parmesan, pine nuts, and salt and continue to process until well-combined.

DSC07453

Gussied Up Mac & Cheese {Recipe Redux}

From the Redux team: Go through your pantry, cupboards, freezer, or fridge; what ‘treasures’ have you found? Pick an ingredient/spice/condiment that’s been hanging out for a while and give it the attention it needs. Share a healthy recipe made using your new-found pantry prize.

gussied up mac and cheese

One thing that is always present in my pantry is boxes of (whole grain) macaroni and cheese.  Yes, the old-school kind with the powdered cheese.  We like that the pasta is already portioned out – three to four servings-worth versus a 1 lb box – and only takes 6 – 15 minutes to cook depending on the brand, making it almost too easy to bypass to turn to take-out.  We always have spices/sauces on hand and frozen chopped vegetables in our freezer, so we are always prepared to gussy up a box of mac for a quick and easy dinner.

Typically I like to pair the mac with canned smoked fish (another item that is a pantry must-have for us), but since I wanted to share this “recipe” with the wider Redux audience I decided to go vegetarian this time with a can of beans.

The great thing about this dish is that it is so easy to customize to accommodate what you have on hand.  I tested the recipe with canned items but obviously you could sub in fresh varieties no problem.  If using fresh broccoli, just precook it and add it with the other vegetables.  I recommend ignoring the directions for adding milk and butter to make a cheese sauce and using sour cream instead, but if you don’t feel like buying sour cream this would still work if you made the sauce according to the back of the box.

Mexican Mac & Cheese, serves 4

  • 6 oz box macaroni and cheese
  • 2 heaping cups frozen broccoli
  • 1/4 cup low-fat sour cream
  • 15.5 oz can low-sodium black beans, rinsed and drained
  • 1/2 cup sliced black olives
  • 1/2 cup diced mild green chiles
  • (optional topping suggestions) caramelized onions, hot sauce, shredded cheddar, chopped avocado
  1. Cook the pasta according to the package directions.  When 3 minutes remain in the cooking time, stir in the broccoli and cook it along with the macaroni.  Strain the cooked pasta and return to the pot.
  2. Add sour cream and cheese packet (no milk or butter!) to the pasta.  Stir in sauce, along with olives and chiles.  Carefully fold in beans.
  3. Divide pasta among 4 bowls and top as desired.

gussied up mac and cheese

What items are always stocked in your pantry?

Two For One {Recipe Redux}

And one for all!

From the Redux teamWe’re all about cooking once and eating twice. In short, double dinners are better. Show us how you take a favorite recipe already on your blog – and ReDux the leftovers into a new dish. Or, whip up a new healthy recipe and give suggestions on how to make it a second meal. For example, slow cooker pot roast could become shredded beef tacos; or grilled chicken breasts might morph into chicken salad.

Rather than stretching a dinner, I set my sights on dessert.  Who’s surprised there?!

DSC06098

I am a big rice pudding fan, so my Chia “Rice” Pudding is one of my favorite treats.  This chia pudding is a quicker (tastier!) spin on rice pudding.  Chia seeds replace rice for a pudding that is still chewy, creamy, and sweet.  And since chia seeds are a great source of fiber and omega-3 fatty acids, this is pretty darn healthy for a yummy dessert.

Sadly, my husband is brave enough for chia seeds, but can’t stand good, old rice pudding, so I usually am enjoying the dish by myself.  For this challenge, I morphed the unwanted 2nd serving of the pudding into a quick and yummy cookie flavored smoothie that is packed with fiber.  The smoothie got rave reviews; ironically, my husband said it’s the best smoothie I’ve ever made!  It really does taste just like a liquefied oatmeal cookie.

Chia “Rice” Pudding

Servings: 2; Prep Time: 5 minutes; Cook Time: 10 minutes

  • 1.5 cups skim milk
  • 3 Tbsp chia seeds
  • 3 Tbsp light brown sugar
  • 1 large egg
  • 1/4 cup raisins
  • 1/2 tsp ground cinnamon
  • 3/4 tsp vanilla extract
  1. Bring milk to a simmer in a small saucepan over medium heat.
  2. Whisk chia seeds into milk and continue to simmer for 5 minutes, stirring regularly.
  3. Meanwhile, beat the egg in medium bowl.
  4. Whisk brown sugar into milk mixture.
  5. Slowly stream half of the milk mixture into the egg, whisking constantly so the egg doesn’t begin to cook.
  6. Whisk the egg mixture back into the pan and continue to simmer, whisking constantly, for another 2 minutes.
  7. Remove the pan from the heat and stir in cinnamon, vanilla, and raisins.

The pudding does not need to thicken or set so it can be served immediately.

DSC06096

And the next day – – –

Oatmeal Cookie Smoothie

Servings: 1; Prep Time: 5 minutes; Hands-On Time: 3 minutes

  • 1/3 cup rolled oats
  • 1 cup milk of choice
  • heaping 1/2 cup leftover chia rice pudding
  • small frozen banana
  • (optional) 2 Tbsp maple syrup or 2 pitted medjool dates
  1. Place oats and milk in your blender and let sit until softened, 3 – 5 minutes.
  2. Add remaining ingredients and blend until smooth.

I recommend trying it without the optional sweetener first and blending that in later at the end if you decide it’s needed.

DSC06143

How do you feel about leftovers?  Love the convenience or hate the thought of a dinner repeat?

Chocolate Marshmallow Love {Recipe Redux}

This is my first post for The Recipe Redux, the first and only recipe challenge founded by registered dietitians.  “The Redux is focused on taking delicious dishes, keeping them delicious, but making them better for you.  [It aims] to inspire the food lover in every healthy eater and inspire the healthy eater in every food lover.”

I will be posting my Recipe Redux entry on the 22nd of each month.  Click on the link at the bottom of this post to see what others posted.

Each month has a prompt/theme, and this month, because most people probably still have Valentine’s candy hanging around, we were prompted to share our favorite chocolate matches.  I know that most people will go with peanut butter.  Some fringe folks will adore chocolate and mint.  I’ll be shocked if one of the healthier bloggers doesn’t go with chocolate-dipped fruit.  For me, it’s all about the s’more – my favorite thing to pair with chocolate is marshmallow.

Clearly s’mores creations are near and dear to my heart (Over the past few years I have created recipes for s’mores brownies, cups, snack balls, pies, cupcakes, and more – check out my recipes in the right sidebar!), but one recipe – My S’mores Monster Cookies – is a bit healthier than the others.  The monster cookies use peanut butter and only a little bit of butter.  Plus they are loaded with rolled oats.  Even better, the s’mores monster cookies are my Valentine’s favorite recipe, so this month was the perfect time to whip up a batch for him.

DSC05713

S’mores Monster Cookies

Yield: 12 monster-sized cookies; Prep Time: 15 minutes; Cook Time: 15 minutes

  • 1 large egg
  • 1/2 cup packed light brown sugar
  • 1/3 cup granulated sugar
  • 1/4 tsp vanilla extract
  • 3/4 tsp baking soda
  • 2 Tbsp salted butter
  • 1/2 cup smooth peanut butter
  • 1 cup rolled oats
  • 2/3 cup milk chocolate chips
  • 1/2 cup Jet Puffed Vanilla Mallow Bits or mini marshmallows
  1. Preheat oven to 350 degrees Farenheit.  Line 2 ungreased baking sheets with parchment paper or Silpat mats.
  2. In a large bowl, use a mixer to beat the egg.  In order – add sugars, vanilla, baking soda, butter, and peanut butter, mixing well.
  3. Use a spatula to fold in oats, chocolate chips, and mallow bits.
  4. Scoop dough with a 1/4 cup measuring cup and roll into balls.  Evenly space six balls per baking sheet.
  5. Bake 13 – 15 minutes until browned.

Notes:

  • You can also use a Tbsp of dough per cookie to create a larger batch of smaller, less monstrous cookies and they will turn out fine
  • I prefer to use natural, no-added salt peanut butter for this recipe – just be sure to stir the top layer of oil into the jar before you measure out your peanut butter
  • If you want to sneak in a little more fiber, swap out half of the chocolate chips with 1/3 cup dried fruit such as dried cranberries

DSC05721

What is your favorite flavor to pair with chocolate?